Wednesday, March 28, 2012

Red Re-Vamp with Essie

Good day ladies!! What a wonderful, normal, drab Wednesday. At least the weather is nice:) I wanted to try to spice today up with a little color! Last night I was sitting there looking at my polishes trying to decide what to do.  I am always doing different colors and realized I kind of miss the classic manicure- red. But, I'm trying to experiment with different looks, so I thought I would try to re-vamp this common but always stylish mani.

clambake, really red, fishnet stockings

With this in mind I picked my favorite reds and went to work.  I didin't do it on purpose, but the 3 reds I used are all Essie. I started off with CC Stuck on You basecoat then I applied a small half moon with one coat of Essie clambake, which is more of a dark orange. This color is a little sheer, which I liked, so I left it that way and didn't want to go any darker since I was doing a gradient. The trick complete one nail at a time before each polish has time to dry. So, next I used from half-way up (a little before where I stopped with clambake) and applied one coat of Essie really red, which is just what it's called, just a classic red. I kind of used my brush to mix the 2 layers of colors together to give it that gradient look. I used Essie fishnet stockings on as the top layer. I used the same tecnique by kind of using my brush to mix the 2 colors together then applied a small second layer to the very top to give me a more gradient look and blend the colors. As soon as I finished one hand I used a clear top coat to blend the colors even more. I let all that dry for about 15-20 minutes then used one coat of old Seche Vite (which is thick now and I love it!)

Photobucket

Sunday, March 25, 2012

Boho Spring Glam Nail Art

Good evening all polish ladies!! Hope everyone had a great weekend! We had a great time visiting my family in Arkansas and letting everyone meeting Kade. It was beautiful weather here!
So, I have been working on this post for a couple of days, but keep falling asleep as I'm trying to edit and post my pics lol. Being married/having a family and swatching and blogging is hard to juggle. There's just not enough hours in the day, but I'm still trying...
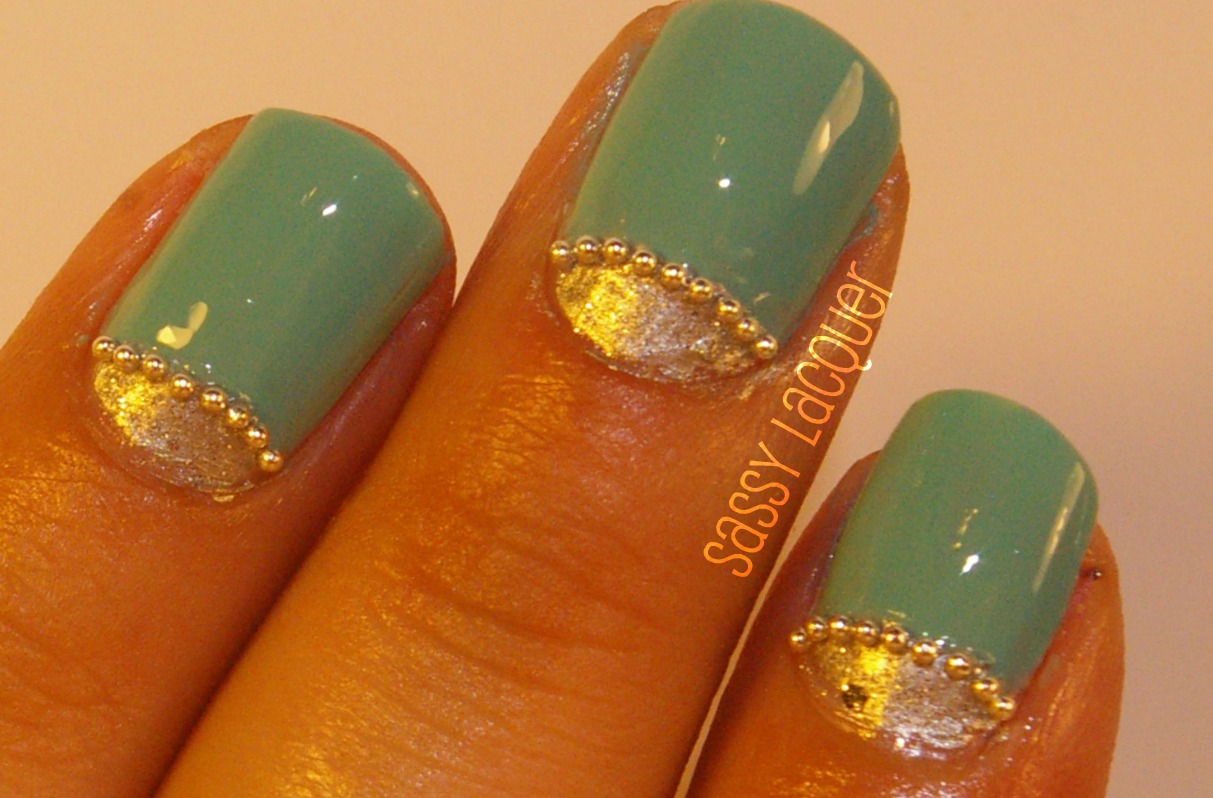
I had bought these little silver ball nail art thingys at Sally's a while back, but never used them, and when I picked out my main color, Color Club New Bohemian, I knew what I wanted to do.

I started out with Seche Base Coat RidgeFiller then I used Sephora by OPI Queen of Everything at the bottom of my nails- only about half way up. Then I used 2 coats of Color Club New Bohemian over the silver to create a half moon look. I love how easy it was to apply this pastel creme. The second coat was so simple to apply and looked so shiny even without a top coat. I was wanting a silver glitter bottom, but the glitter wasn't thick enough so I used 2 coats of Nerd Lacquer Carbon Allotrope. I let all that dry then used to coat of Seche Vite (a new bottle) I then put a small amount of the Nerd Lacquer on as a glue for the nail art dots. I used my MASH tweezers to get them on my nails. I didn't put a top coat over the nail art because I didn't want any excess top coat to become lumpy.
Overall, I was very pleased with my result, and can't wait to some more nail art and try something different.


Photobucket

Tuesday, March 20, 2012

Hello Spring...I've Missed You! Fun with Revlon Pink Lingerie

This weather is awful! We were in a tornado warning for a while this afternoon and it's at 100% rain all day today and tomorrow. Boo. Well, Happy Tuesday to all! I had a great weekend shopping for some decor for my house and new addition to our hamster cage so she can have more room to play. I'll be getting a puppy in a couple of weeks! I'm so excited!!!

I think I have finally began to fix my lighting or lack thereof issue I've been talking about.  I have bought 2 of those cheap student bendable lamps and put them side by side then change the setting on my DSLR that makes my pictures look much better. I still have some more playing around until I can finally have an actual light box, but until then, I will continue to play around with different kinds of light. These were taken inside, at night, with both lamps and a flash.

SO...onto the polish. I went shopping for some polish this past weekend and found quite a stash of spring beauties. I was really looking for CG Hunger Games Collection- which I found! (after 3 Sally's stores) But I wanted a spring, pastel look.  Well, I was checking out the Nailasaurus blog and saw this AWESOME look she created that you can see here.  So, giving credit where credit is due, I did just what she did to create this simple yet stylish look.

I started out with my Stuck On You basecoat by CC, then I used 2 coats of Revlon Pink Lingerie. I'm not a pink wearer, but this color is awesome. It's bright but still considered a pastel, so it's both spring and summer. It goes great with darker skin tones. 

 Then I used NOPI Rainbow in the S-Kylie on my tips and kind of did a gradient thing and used 2 coats on the very tip. Lastly I used 2 coats of Seche Vite. I got a lot of compliments on this look and would love to use some other colors with this same idea. Then I want to reverse it and have a half moon look with a solid color and glitter at the bottom.


Photobucket

Thursday, March 15, 2012

Nerd Lacquer Swatches

Hello, all you polish ladies! It has been like 3 weeks since I last posted. I am polishing my nails at least every other day and take pictures, but just don't have time to upload and write.  Life has been crazy and busy and I find it very soothing to sit down and paint my nails, but by the time I've painted my nails and taken pictures the sun is gone and it's time to go to bed! Where does the day go?!
Well, I have been buying lots of polish online, especially indie brands such as Nerd Lacquer, which is what I'm bringing you all today.  I ordered four colors and bought one of Amanda's new polishes, Carbon Allotrope. I was sooo excited to get them in, but didn't get any pics of the box as I got them in. Here they are separate as I swatched them.  It took me a couple of days to get all of them on and take pictures. I am still trying to made a lightbox so I can take pictures inside, but alas, I don't have a dang box! I can't remember the last time I DIDN'T have a box!


Carbon Allotrope is made up all sizes of silver glitter, very fine and required 4 coats to get my nails fully covered, but I didn't mind. It was a very easy polish to apply and I could apply them fairly thick. This is a beautiful silver color with high quality micro glitter. I am hoping to order her other high end nail polish, Holy Grail, which sells on her etsy shop for $18. 
The next color I bought was Event Horizon, which is a turquoise color with multi-colored micro glitter and big silver glitter. It only took 2 coats of this beautiful deep green to get my nails fully covered.
My third color, Resolutionary is a bright pink with big gold glitter and small silver micro glitter.  Again, this polish only took 2 coats.
My last polish is Gorramit, which was my favorite because it is so unique.  It's one of the first colors I saw that really pulled me in on purchasing some Nerd Lacquer. This bright yellow has big red and yellow glitter with silver micro glitter. I also used 2 coats for this application.
I have been wanting to purchase some of her polishes for a while, but she hasn't been taking any orders and opened her shop for a few days, so I took full advantage! I would have ordered more, but it gets a bit costly. She has so many more colors I want to purchase and can't wait for her to open her shop back up. She also sells some on Harlow & Co., but as of today, all were sold out except for one!
Here are some more pics of each of the four polishes I bought. Like I've said, none of these are new to the polish world except Carbon Allotrope, but I thouroughly enjoyed swatching these and hope I can upload another post soon! I have plenty of pictures, it's just finding time to write! Happy Thursday to all!!!


Photobucket

Wednesday, February 22, 2012

Polishing with the Un-Named

Hey all you polish girlies! As I was looking at all my polishes I came across this polish that I got a while back called "Designers Choice" that I got for 99 cents. It's such a pretty copper/yellow duochrome foil that I had to was just sitting on my shelf calling my name.  I started out with Orly Bonder then applied 3 coats of this cheap polish.  I will say that the saying "you get what you pay for" definitely applies to this polish...
Here's what it looks like in regular light- kind of a coppery foil with a hint of reddish yellow
It's thin and I had to put the top back on and shake it up a few times during application to keep it from I found that it was thin then it would be really clumpy- especially at the end of my nail where it would gather and just clump up and I would have to wipe it off. I just kept in mind that I paid less than one dollar for it, so...
In direct sunlight- has a yellow foil duochrome
Lastly, I applied Seche Vite top coat, as always, as this stuff works miracles to seal off the color! I just got this bottle a few weeks ago and it's already almost half gone! But it's only $6 at Wal-Mart and Sally's. All in all, it was worth my $1 and I will probably use this to make Frankens and such. I am happy with the results I got and wish it had a name, but alas, I suppose I will give it a name...
Here is the straight cooper foil color in the sunlight
Here it has a green tint to it

Here's a clear view of the duochrome colors- red, orange, gold,
green, and yellow

We'll call this one DC (Designers Choice) Golden Girlies...

Photobucket

Tuesday, February 21, 2012

Happy Fat Tuesday!

Good evening polish people! So, since I'm new to Louisiana I don't know much about Mardi Gras, but I thought in the spirit of things I would join the festivities in my own little way- by dedicating my daily look what they call "Fat Tuesday".  Alls I know is we got to wear jeans to work today- hey, whatever Fat Tuesday is- I'M IN lol. So, I know the colors for Mardi Gras are typically purple, green, and gold, so that's what I went with.

I started out with Orly Bonder, then used 2 coats of Nfu-Oh 51. I LOVE this color! It's about the best color out there! Then I used Red Angel Plate RA-120. I'm not sure what it is, but it looked like it went with the theme and it looked nice when I used Orly Glitz as my stamping polish. Then using my dotting tools I used Revlon Posh to fill in some of the stamp. I finished that with a green rhinestone on each finger- I didn't want to go overboard. And of course ended with 2 coats of Seche Vite top coat. I really like my end result and these polishes work great together. Orly Glitz worked perfect as a stamping polish and I defintely recommend.

Photobucket

Saturday, February 18, 2012

Franken with m60

WOW! This has been a crazy week! I had the best of intentions of posting my 3rd day of nails for V-Day, and I did new nails for the 14th, but they I was so tired and they looked crappy and I couldn't bring myself to even take pictures:(

I had this ingenious idea to make frankens for all my new co-workers, so I came home Monday night- which is the night I have to take Addie to dance and didn't get home until around 7. I started making mixing after I got home and got done around 1 a.m. I was so happy with my results! I made 8 V-Day themed polishes that I wanted to take pictures of and had the best intentions of posting, but was just so tired:(  Then I finally got around to creating this awesome look for Valentine's Day, but they just sucked. I feel like I am failing as a blogger- I am only able to post once a week because my life is so crazy! I want so bad to do swatches, take pics, and post them. I sit there and just stare at my polishes, buying new ones, reading other bloggers, rearranging my polishes- everything but taking pictures.  It's just so hard to get good pictures when I don't have decent lighting inside and hardly any time to do so.

Plus, I have really gotten into making frakens and have just ordered some more empty polish bottles, so I will be working hard, just may not be posting a lot.
I polish my nails at least every other day, but just don't have time to do everything else to get them on my blog...not sure what to do.

Nevertheless, I was able to create a look for today. For today I wanted to use a franken I made this past week. I have this tank that's this chartreuse, green, gold looking and I wanted to have a polish this color. It looks like China Glaze Trendsetter (which I have swatched) but a little lighter and not as green.  Well, I do like my results, but it's not as green as I would have liked, and I will continue to work on this until I get my desired color.
 
Konad plate m60


First I started out with Color Club Stuck On You basecoat. Then I used two coats of my franken You Are My Sunshine.  It wasn't the best on application, kind of sticky and took a while to dry. Patience is a virtue...

Then I used my new Konad plate m60- my only Konad plate- with Konad special polish in silver.  Now I don't know what the reason was, but I had the HARDEST time getting my stamp to go on my nail.  I had to go over some of my nails twice with the stamp, which I've never had to do before and had to repaint two of my nails b/c I messed up.  I was about to lose patience, but I really wanted to use this paisley stamp. I was determined to make it work. I am pleased with my results. I will try another stamp color next time and see if that was my problem.  My theory on Konad polishes might soon change...I finished up with 2 coats of Seche Vite top coat of course:)


Photobucket

Sunday, February 12, 2012

Valentine's Day Nails- Day 2

Happy Sunday to all! Yesterday I was so busy and tired I didn't get a chance to do another look, so I'm going to change what I said yesterday...SO, today, February 12 is Day 2 of my Valentine's Day Nails, and yesterday being the first (not Friday like I had originally said).  Kade woke up with a bad cough at 2 a.m. and needless to say I'm very tired and still getting ready to begin again on Monday...yay! That' quite a note- I spend my weekend getting ready for the following week- guess that's life, huh?
So, without further ado, my second look:

To create this look I started out with Color Club Stuck On You basecoat. I think I like it better than Orly Bonder. It does that same job, but Orly seems to  be more rubbery and CC looks shinier and not as sticky if that makes sense. Then I used one coat of Color Club French Tip, which is just an opaque white. I then applied 2 coats of Revlon Popular (formerly known as Starry Pink- was released with Whimsical and a few others), which I bought a while back, but haven't used yet.  I saw this and knew it was out of season, but I just couldn't get my mind off of it, and there were only 2 left in the ULTA where I saw it, and knew if I didn't get it, I would regret it.  It's a light sheer pink with silver hexagon glitter and some silver mini glitter.  I wanted to use white so it would bring out the light pink in Popular. The first time I tried this I failed and it was so sticky and clumpy that I had to start over. I had to be more patient this time and let this sit for like an hour- so I thought it would be a opportune time to take a short nap lol.

So, I knew I wanted to try using my dotting tools and paint something simple.Well, what's easier to draw than a heart! So, I picked out my colors- first I outlined the heart with Sephora by OPI Queen of Everything, then using the same size dotting tool, I then used Color Club Hot Like Lava to paint the inside of the heart. I love this color, as you can see in the above pic, it's a foil color (part of the CC Foiled Collection), and has a bit of pink shimmer in it. Finally, I let that dry and took some light pink rhinestones and put on the edge of each heart. I topped it all off with 2 coats of Seche Vite top coat, of course. Voile!


Photobucket

Saturday, February 11, 2012

Valentine's Day Nails- Day 1

Well, after this week of horrible weather, it's finally sunny outside...and we have Kade lol. So, it's kind of hard for me to swatch seeing as I'm constantly chasing a 15 month-old around the house, cleaning and cooking! I did manage to create this Valentine's look last night, though. I really wanted to start out with some non-traditional colors (well anything that wasn't red, pink or white). I will start from yesterday and create Valentine's Day look each day until Tuesday.  I want to see what I can come up with. I'm sure other bloggers are doing something very similar.
Pure Ice Kissy Kiss, butter LONDON Knackered,
 Konad Special Polish in Black with RA120
I used Orly Bonder- I like using a bonding basecoat even if I know I'm not going to keep the mani very long- it does what it says and the polish adheres easier to my nails. I used one coat of Pure Ice Kissy Kiss, which is a sheer jelly periwinkle color (shown in the first picture below) that I thought would bring out the lavender in butter LONDON's Knackered, which I swatched a few weeks ago with butter's Spring 2012 Collection. I love this color because it's so versatile! It's a beautiful duochrome with multi-colored micro glitter and looks different everytime I use it. I love how it shimmers and changes colors in the sun. I can take a million pictures this polish on!

I only used one coat since I knew I was going to stamp. Using Konad Special Polish in black I used Red Angel stamp RA120, as shown left.  I'm not a hearts kinda gal, but since this look is for the holiday dedicated to love, I thought I'd branch out.  Again, on the Konad special polish, I love it even though some say it's not necessary and to use regular polish, which I've been doing, but find that I like Konad better and don't mind spending the few extra bucks. I love the easy pick up and application. I never doubt it's ability to do what it was created to do and all I have to worry about is my ability to apply it well lol. I still need quite a bit of practice on my stamping, but I'm getting there.  Finally, I topped that off with 2 coats of Seche Vite top coat. I absolutely LOVE this stuff and will never use anything different! I will have to get a bottle to include in my giveaway (it's $10 at most retailers).


I wasn't quite thinking it through when I was stamping and should've put the hearts facing the other way so I wouldn't have to turn my hands upside down, but oh well. And my middle finger (of course) has a heart that looks a bit smudged, so please just keep in mind that this is the holiday for love:) I stopped with this simple look, because I didn't want to start a project that I literally couldn't finish. I need more practice before I start doing more complicated looks.  If left to play, I will work on my nails for 2 hours!

I will try to post another look for today (this is actually Friday's look) sometime tonight if I can get a chance to swatch.  Right now I'm cooking peanut butter brownies, washing dishes and clothes, so I'm a busy body today, but I'm sure I will make the time to do another look:)
Photobucket