Showing posts with label color club. Show all posts

Monday, August 20, 2012

Fergie Gone Neon

Happy Monday to all! Hope everyone had a good weekend. School has started for most people. Addie starts 4th grade on Wednesday.  Her school is so small that she just moves next door. There's one teacher/class per grade. So, as you move up you just make a "U" around the school..ha. Kinda cute, I guess.

Well, I am working on another little quiz, but I'm going to make it harder...that was way to easy, but I was just seeing how it would work. It was a test run. I will try to have one in a couple of weeks.

So, I am still working on getting better at nail art or just stamping...that's not really nail art, I guess, but it's something I'm still having to work on. So, I thought I'd bring a little example that I conjured up ha. I did some tweaking on my cuticles (they got a little dry between swatches and I guess I didn't really notice until I started editing my pics...srry!)


I used Wet 'N Wild from Fergie's new line Glowstick. It is an almost neon green shimmer that applies easily with 2 coats. I say "almost neon" because neons have been so popular this year that to me true neons hurt your eyes when you see them such as Orly Glowstick, which I also have, but just haven't swatched. One of those that I saw it once and had to have kinda polish (hence the name...) This is still a pretty color and looks nice as a shimmer.

I used Orly Bonder as a base.. 2 coats of Glowstick. I used Color Club Revvvolution,which is my fav gray holo, as my stamping polish and one of my new stamps from Cheeky Monkey CH16. Then finished off with...yup, thick coat of Seche Vite. Have you tried any of the Fergie Line yet? If so, what's your favorite color? What do you think of them?


 I wanted to show you a vid of Fergie but wouldn't upload, so I am bringing you some Dave Chapelle...almost the same, right? Does the name Tyrone Biggums ring a bell to anyone?? Well, watch below if you want a good laugh:


Photobucket

Saturday, July 7, 2012

Cult Nails Layering

Well, this has just been a weird but kinda cool week with a holiday being on a Wednesday. So, we worked 2 days then a day off, then working another 2 days then having a weekend. I could get used to that. Anyways, we have been out in the sun with Kade and I need a nap...ha.

Well, I have been wanting some Cult Nails polish for a while, so I finally found some I really wanted. I don't think I'll ever get my hands on some Unicorn Puke, but I am a new super fan of Cult Nails now...I bought the Divas and Drama Collection that is on sale on their website. That included Scandalous, Enticing, Manipulative, and Seduction. I also bought Charming from the Fairy Tale Collection just cause it looked so pretty. So, I had just checked out and then found the nail art- studs and rhinestones that I haven't been able to find anywhere else. I immediately emailed them and asked if I could change my order. They let me add to it and didn't charge me the extra shipping! John from Cult Nails even emailed on the 4th to help me out! How awesome are they?!

So, today I'm only reviewing 2 of the polishes and not the whole collection. I wasn't sure what mani I wanted to do, but all these polishes are quite sheer, so I thought I would try some layering. This was my result:


This is what I used:


I used 1 coat of Color Club Hot Like Lava from the Foiled Collection, then I used 1 coat of Charming and 2 coats of Seduction then I used Essie Matte About You for a matte finish. I was torn when it came to using this because I didn't want it to runi the shimmer, but I like the outcome. It's not really noticable in these pictures, but Charming is a beautiful almost duochrome light purple and pink shimmer, like it looks on their website here.


So, I've been thinking of a way to spice up my reviews and add a little something extra that says something about ME. So, I will leave you with a lil bit of diva....if no one has ever heard of Rob Hoffman then you def need to check him out! This is the "Yes Dance". No matter how many times I watch it, it never gets old! Plus, he's just so freaking hot! (he played Chase in "Step Up 2").


Anyways, hope everyone has a super weekend, divas!! I'm out!


Wednesday, June 20, 2012

Dollish Polish Random Dancing

Good Wednesday to all! So, we're halfway done with this week, yesterday was the first day of summer and we are already breaking records with this awful heat! It was 100 degrees today in northern Louisiana. I got in my car after I got off work and I had to roll my window down and hang my head out just to be able to breathe!!

Well, I have been shopping for the past couple of weeks for some new polish and finally decided on the indie brand K.B. Shimmer, who just opened their shop back up for a while. I also got some soap samples that I'm super excited to try!

Today, I thought I'd post on some old swatches from another indie brand- Dollish Polish. I have been trying to catch her again when she has some polishes in stock, but I always seem to just miss her:( But a while back- when she was still on Etsy I got a couple of polishes, one of which I am showing today, Random Dancing.


 If I had painted all my fingernails with this wonderful glitter I would have used to whole bottle! It's got so many different glitters in it, but it took me a LOT of layers to cover my full nail. I didn't use any color as a base so this ended up being VERY thick, but looked awesome once I applied like 10 coats! For my other nails I used 2 coats of Color Club Warhol, which is actually a bright, almost neon pink, but appears bright red in these pictures. No matter what kind of light I used it came out red, but with all the different glitter colors it matched. I would apply a few coats of Random Dancing then kind of push it around with my fingers since the base of this polish has a jelly-like consistency that I very much like. I made it easy to put the glitter where I wanted it on my nail. And I finished it off with Seche Vite, of course:)


Sadly, a couple of weeks ago my step-son, who likes to get a couple of my polishes and carry them around...he happened to get this polish and had it in his mouth and the ate the "Dollish Polish" sticker right off the polish, so now it looks like it has no name or brand:( BUT, I did manage to take these pictures before it was "destroyed"...

Photobucket

Thursday, May 17, 2012

Color Glaze and Rhinestones

Well, I have been getting really behind in posting swatches, but I have been a busy girl. Nothing out of the norm, just not enough time to do everything...
I really enjoyed doing this look and thought it turned out really well.


As I was reading one of my favorite blogs, the Nailasaurus, it dawned on me how she got her nails so shiny...I felt so stupid. Use a thicker coat of topcoat, duh. So, I started combining my bottles of Seche Vite and came up with 3 bottles from oldest to brand new. Works like a charm and it dries much faster than I thought. I mean, that's why it's a top coat, right? Anyways...

This look was created by using a basecoat then used 2 coats on 3/4 of my nail using Color Club Rad Nomad, which is the purple grayish color and then 2 coats of China Glaze Kinetic Candy on the other quarter. I used 3small black rhinestones and then used 2 thick coats of SV! Voile!


Photobucket

Monday, April 16, 2012

Spring Layers

It has been a while since my last post. Things are still crazy and not much has changed.  That hasn't stopped me from painting my nails every other day, but I haven't had time to take pics and post....or I'm just too damn tired...BUT! Good news for me...I FINALLY made a lightbox!! Yay! I tried waiting around for a box, but I finally bought one at Wal-Mart...how sad. My husband makes fun of it, but it's just a box to him. So, I had to take some pictures after I made it. So, without further ado, my first post with a lightbox! (I can't tell much difference if you ask me, which is rather depressing.)


I used CC Stuck on You as a basecoat. I've been experimenting with basecoats lately, but I never keep my polish on long enough to really tell a difference other than the application of my first layer of polish, which does make a bit of difference depending on what kind of polish I'm using (glitter, creme, sheer, etc.) I then used one coat of Finger Paints Pop Rock Pink from the Spring 2012 collection, which is actually more a peach color than pink, i think. I love this but wanted to try some layering witht this mani, so I continued with one coat of Sally Hansen Hidden Treasure (419, the new color release). I bought this a while back, but haven't worn it yet. I LOVE it, and can't wait to try it again. It's this beautiful light sheer shimmery pink that makes me think of sparkly cotton candy lol. At this point, I didn't want to go too far and change the color I had created.  So I used another color I had bought a long time ago but  haven't ever worn. One coat of Pure Ice Busted, which is a very shimmery iridescent purple and pink. Lastly, I finished with a coat of Northern Lights Cut the Door Holographic Top Coat Silver. I've seen this in Sally's and finally decided to try it. I only used one coat, so I didn't get much out of this, but I will try again with a darker color to really see what this offers.  I had fun with the layering and will try again soon with some different combinations. 

without my flash, in lightbox
Hope everyone who is in this part of the US is enjoying this beautiful weather (minus all the devastating tornadoes and storms). I was reading an article on global warming yesterday and how this March's warm weather has broken thousands of heat records in the US and is an exact example of global warming. So, with this, enjoy your week wherever you are and happy polishing!!


Photobucket

Sunday, March 25, 2012

Boho Spring Glam Nail Art

Good evening all polish ladies!! Hope everyone had a great weekend! We had a great time visiting my family in Arkansas and letting everyone meeting Kade. It was beautiful weather here!
So, I have been working on this post for a couple of days, but keep falling asleep as I'm trying to edit and post my pics lol. Being married/having a family and swatching and blogging is hard to juggle. There's just not enough hours in the day, but I'm still trying...
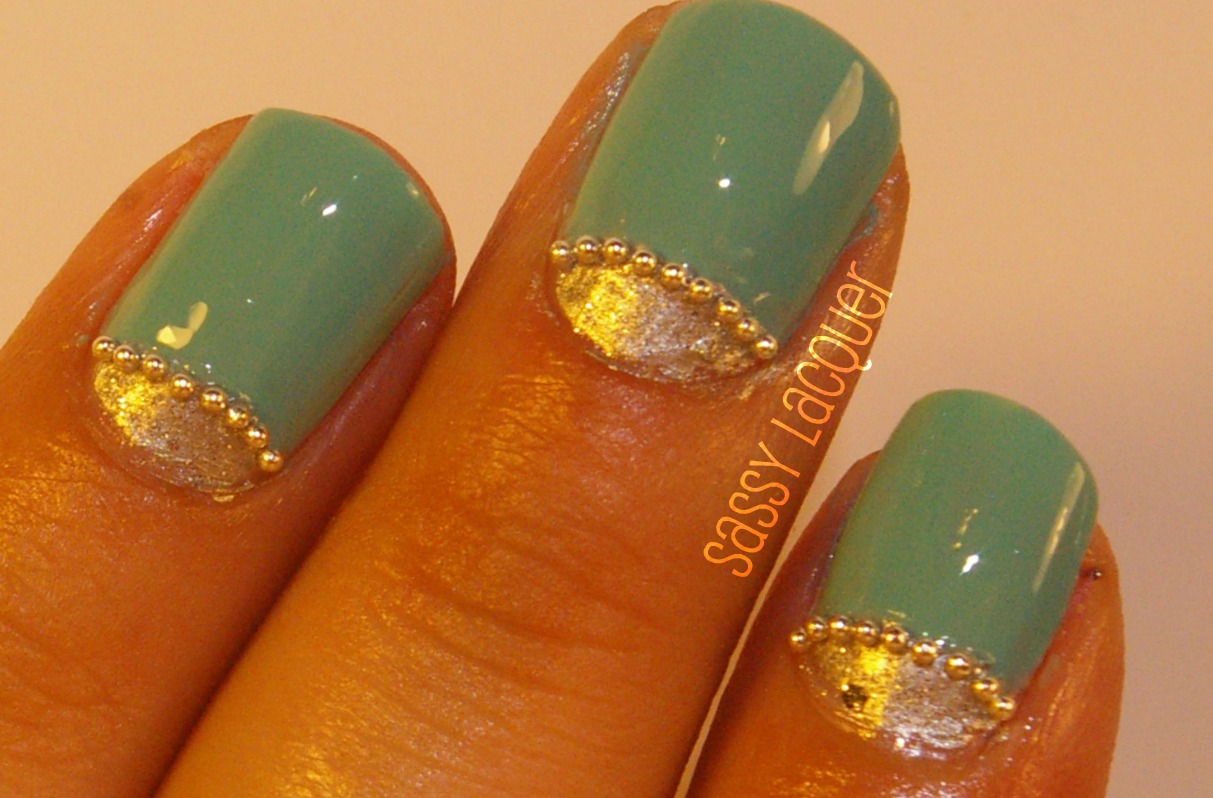
I had bought these little silver ball nail art thingys at Sally's a while back, but never used them, and when I picked out my main color, Color Club New Bohemian, I knew what I wanted to do.

I started out with Seche Base Coat RidgeFiller then I used Sephora by OPI Queen of Everything at the bottom of my nails- only about half way up. Then I used 2 coats of Color Club New Bohemian over the silver to create a half moon look. I love how easy it was to apply this pastel creme. The second coat was so simple to apply and looked so shiny even without a top coat. I was wanting a silver glitter bottom, but the glitter wasn't thick enough so I used 2 coats of Nerd Lacquer Carbon Allotrope. I let all that dry then used to coat of Seche Vite (a new bottle) I then put a small amount of the Nerd Lacquer on as a glue for the nail art dots. I used my MASH tweezers to get them on my nails. I didn't put a top coat over the nail art because I didn't want any excess top coat to become lumpy.
Overall, I was very pleased with my result, and can't wait to some more nail art and try something different.


Photobucket

Saturday, February 18, 2012

Franken with m60

WOW! This has been a crazy week! I had the best of intentions of posting my 3rd day of nails for V-Day, and I did new nails for the 14th, but they I was so tired and they looked crappy and I couldn't bring myself to even take pictures:(

I had this ingenious idea to make frankens for all my new co-workers, so I came home Monday night- which is the night I have to take Addie to dance and didn't get home until around 7. I started making mixing after I got home and got done around 1 a.m. I was so happy with my results! I made 8 V-Day themed polishes that I wanted to take pictures of and had the best intentions of posting, but was just so tired:(  Then I finally got around to creating this awesome look for Valentine's Day, but they just sucked. I feel like I am failing as a blogger- I am only able to post once a week because my life is so crazy! I want so bad to do swatches, take pics, and post them. I sit there and just stare at my polishes, buying new ones, reading other bloggers, rearranging my polishes- everything but taking pictures.  It's just so hard to get good pictures when I don't have decent lighting inside and hardly any time to do so.

Plus, I have really gotten into making frakens and have just ordered some more empty polish bottles, so I will be working hard, just may not be posting a lot.
I polish my nails at least every other day, but just don't have time to do everything else to get them on my blog...not sure what to do.

Nevertheless, I was able to create a look for today. For today I wanted to use a franken I made this past week. I have this tank that's this chartreuse, green, gold looking and I wanted to have a polish this color. It looks like China Glaze Trendsetter (which I have swatched) but a little lighter and not as green.  Well, I do like my results, but it's not as green as I would have liked, and I will continue to work on this until I get my desired color.
 
Konad plate m60


First I started out with Color Club Stuck On You basecoat. Then I used two coats of my franken You Are My Sunshine.  It wasn't the best on application, kind of sticky and took a while to dry. Patience is a virtue...

Then I used my new Konad plate m60- my only Konad plate- with Konad special polish in silver.  Now I don't know what the reason was, but I had the HARDEST time getting my stamp to go on my nail.  I had to go over some of my nails twice with the stamp, which I've never had to do before and had to repaint two of my nails b/c I messed up.  I was about to lose patience, but I really wanted to use this paisley stamp. I was determined to make it work. I am pleased with my results. I will try another stamp color next time and see if that was my problem.  My theory on Konad polishes might soon change...I finished up with 2 coats of Seche Vite top coat of course:)


Photobucket

Sunday, February 12, 2012

Valentine's Day Nails- Day 2

Happy Sunday to all! Yesterday I was so busy and tired I didn't get a chance to do another look, so I'm going to change what I said yesterday...SO, today, February 12 is Day 2 of my Valentine's Day Nails, and yesterday being the first (not Friday like I had originally said).  Kade woke up with a bad cough at 2 a.m. and needless to say I'm very tired and still getting ready to begin again on Monday...yay! That' quite a note- I spend my weekend getting ready for the following week- guess that's life, huh?
So, without further ado, my second look:

To create this look I started out with Color Club Stuck On You basecoat. I think I like it better than Orly Bonder. It does that same job, but Orly seems to  be more rubbery and CC looks shinier and not as sticky if that makes sense. Then I used one coat of Color Club French Tip, which is just an opaque white. I then applied 2 coats of Revlon Popular (formerly known as Starry Pink- was released with Whimsical and a few others), which I bought a while back, but haven't used yet.  I saw this and knew it was out of season, but I just couldn't get my mind off of it, and there were only 2 left in the ULTA where I saw it, and knew if I didn't get it, I would regret it.  It's a light sheer pink with silver hexagon glitter and some silver mini glitter.  I wanted to use white so it would bring out the light pink in Popular. The first time I tried this I failed and it was so sticky and clumpy that I had to start over. I had to be more patient this time and let this sit for like an hour- so I thought it would be a opportune time to take a short nap lol.

So, I knew I wanted to try using my dotting tools and paint something simple.Well, what's easier to draw than a heart! So, I picked out my colors- first I outlined the heart with Sephora by OPI Queen of Everything, then using the same size dotting tool, I then used Color Club Hot Like Lava to paint the inside of the heart. I love this color, as you can see in the above pic, it's a foil color (part of the CC Foiled Collection), and has a bit of pink shimmer in it. Finally, I let that dry and took some light pink rhinestones and put on the edge of each heart. I topped it all off with 2 coats of Seche Vite top coat, of course. Voile!


Photobucket

Sunday, February 5, 2012

Stamping With ULTA For Bitten and RA-104

Wow, this has been a long week! I have been dying to swatch and photograph, but the weather has been horrible all week! Storms Thursday through Saturday afternoon. I don't mind swatching inside, but my camera seems to work best on macro when I'm outside without the flash, so I don't argue with it.  Doesn't matter how awesome my nails look, if I can't get a good pic, then I can't share :(

So, last this past week I ordered a lot of goodies from Amazon that I've been picking out for a while now- Red Angel Plates, MASH dotting tools (as shown below), MASH plate holder, some Konad special polishes, nail art rhinestones and tweezers for them, Konad plate, and a MASH crystal/glass file, and finally some empty polish bottles so I can make Frankens! So excited!! I got half of my stuff, but still waiting for the rest. I love getting packages! Oh, and I ordered some Bootie Babe polishes! (will post when I get those!)

I was really inspired and wanted to use just about everything I got all at the same time, but it's not as easy for me as it looks.  I was so excited and started out with a look I thought would look great, but it turned out crappy, so waited until this morning to try something else.

I started off with Color Club Stuck On You basecoat, then two coats of ULTA For Bitten, which is a beautiful deep red/purple/gold duochrome, shimmer that I have bought a few weeks ago, but haven't used yet. I think I will try this again soon without stamping, which kind of hides its beauty.
ULTA For Bitten


I then used my new Red Angel stamps, which I found I like a lot more than the Bundle Monster plates I have, as they are larger- BM has 6 on one plate while RA has 4 and RA was a bit cheaper. The Nailasaurus made put all the plates side by side with their size in this review. I think they only have that one set, though, so I'll be watching to see when they make more! As shown to the right, I used the stamp highlighted on plate RA-104. I used Konad Special Polish in White, which  I understand aren't necessary to use, but I wanted to see for myself. Since I've only used it this once and I haven't been stamping for long, I don't know how much my opinon counts, but I like the special polishes...this is why:
1. As shown on the left, the brush is shorter than regular brushes (compared to Sinful Colors brush), which makes painting the stamp faster and easier so polish doesn't drip.

2. All the colors are very opaque, since they are made for stamping, you don't have to spend time testing polishes, which I will still do...

3. The stamp picks up the polish very easily, without hardly any pressure picking up and applying to the nail.

4. The price of the polish runs anywhere from $3 to $6 a bottle...yes, they are simply for stamping, but in my opinon it's worth it, especially when using white and black, since I will probably use them the most.

5. They dry very quickly and I can still use a regular top coat after a short time.


I finished it up with 2 coats of Seche Vite topcoat.  I tried to get different angles to show the polish in different light, although I didn't have much light to work with as it was overcast for like the 20th day in a row...I just couldn't wait to swatch. I do still need some work as far as my stamping, but I suppose everyone has to start somewhere.  I don't really know how crazy I am about the white over this color, but I went with it, but might try again with a darker color for stamping.
I am excited to get the rest of my loot in, so I will try to get another post or two in this week.

And, to end today, here's my little helper that loves to grab my polish and drop it in the trash thinking he's helping me pick up:)


Photobucket